As a final piece for this module, I am happy with my animatic. It is able to show the directorial skills i have deveolped so far, and also show my creative vision which I hope to bring to life within my final year.
Edward Hudson Animation Year 2 - Term 2
Thursday, 3 May 2012
Finished Animatic
As a final piece for this module, I am happy with my animatic. It is able to show the directorial skills i have deveolped so far, and also show my creative vision which I hope to bring to life within my final year.
Finished Character Model
Texturing my Character
After the character had been modeled within Z Brush, I then went on to texture the character. I also used Z Brush to complete this process. Texturing in Z Brush, for me, was a very creative process, as it allowed me to "paint" directly onto the model; a feature that is not available within Maya. I focused on a muted colour scheme for the character, as this reflected the overall style I wish to emulate within my final, finished film. After the character had been textured, I was able to import the newly sculpted model, and textures, directly into Maya. The character is shown below back within Maya.
Modeling in Z Brush
After completing my base mesh of my character in Maya, I then imported the mesh into Z Brush. Z Brush allowed me to gain a further level of detail to my character model that I would have been able to obtain using Maya alone. I used Z Brush to give my character a sculpted, stop motion puppet aesthetic. I wanted my character to appear as if it was sculpted out of a lump of clay, and the sculpting tools within Z Brush allow me to give my work this finish. The main area that I concentrated this effect onto was the character's beard, hair and eyebrows. The rest of the body was mostly left as it appeared within Maya. I really like the aesthetic Z Brush was able to give my character, and is definitely a program I would use within my work again.
Tuesday, 24 April 2012
Animatic - First Attempt
The above video shows the first draft of my completed animatic. Although I am very happy with the overall look and production of the piece, there are a few key story areas that need further development. After consultation with my tutor, it is clear to me that the structure of the middle act of the piece needs work. While working on my storyboards, I decided that the motivation for the orphan to return the coin to the old man was unrealistic, and needed work. This change is shown in my animatic through the orphan apparently wanting the pick pocket the old man, who has a pocket full of coins. However, once the orphan loses the coin, he has no need to run after it, as he has a whole pocket of coins he could steal from the man. During the process of creating the animatic, this story point became muddled, and it is only now in hindsight that I see the narrative mistake. This is a mistake that is able to be fixed though. A few changes to the animatic, drawing the orphan's attention away from the coin back to the old man, is all that is needed to fix the piece.
Wednesday, 21 March 2012
Storyboards for Animatic
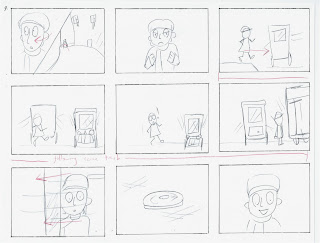
The below Storyboards show my animatic idea. The story will use the two characters of the Old Man and Orphan, and show the Orphans struggle to return a coin to the Old Man, which he has dropped on the ground. The piece takes place within 1920s Moscow, and sees the Orphan weaving through various obstacles in order to return the coin to the Man. My completed Storyboards are displayed below.
After gaining feedback from my tutors, I will change a few aspects of the story. These changes will mainly involve the motivations of the Orphan, and why he wants to return the coin to the old man. I will bring in these changes when I create my animatic.
Tuesday, 20 March 2012
Character Modeling Progression
The below images show the creation of the character model of the old man. I am creating the character model using the techniques I learnt through the digital skilling module. The body of the man was created by using a cylinder which was then manipulated into the right shape, with the head and hands attached to the body after being modeled separately. So far, I think that the character model has worked well, and reflects the original character designs I created. By using the designs as a template, I am able to transfer my 2D drawing, into an effective 3D model.
Subscribe to:
Posts (Atom)


